A tricky thing in C++ – Will a member function call by using a raw nullptr crash? Maybe no.

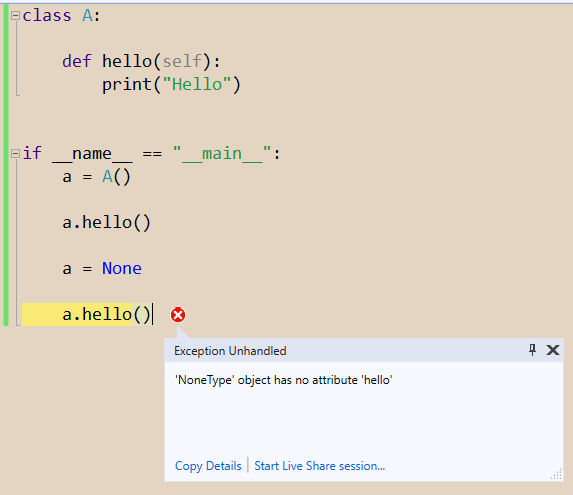
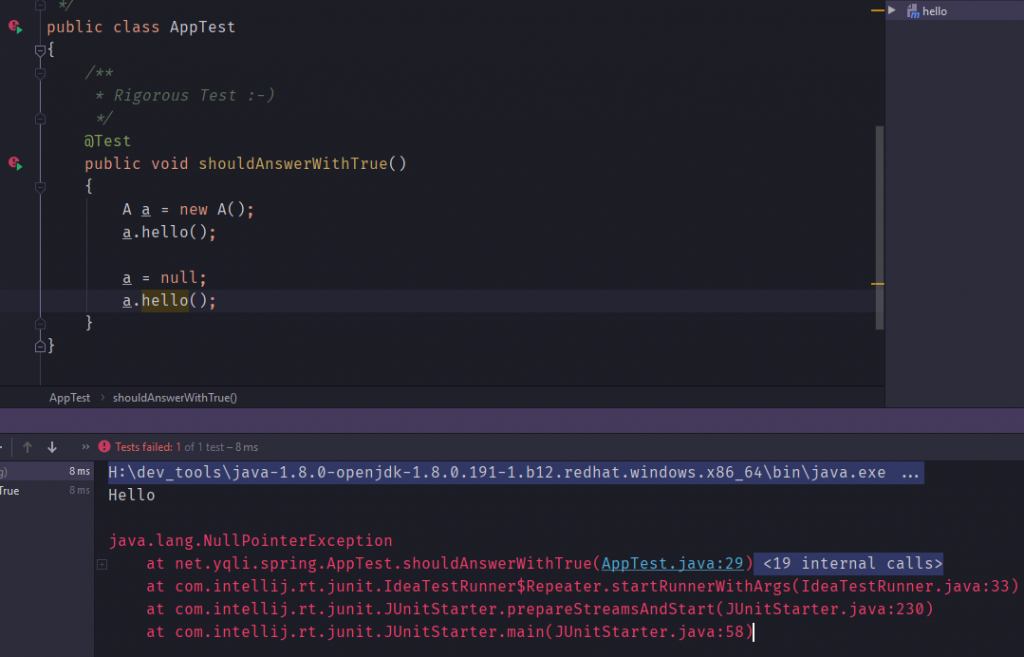
As a Java/Python developer for about 10 years, in my mind, invoking a member function from a raw nullptr, there should have always exceptions, as the following shows.

Maybe you think why I discuss about this naive question. Since recently I found, it’s may not be true for C++ and it depends on how the C++ class defines.

Take a look at the following code written by C++ and execution results.

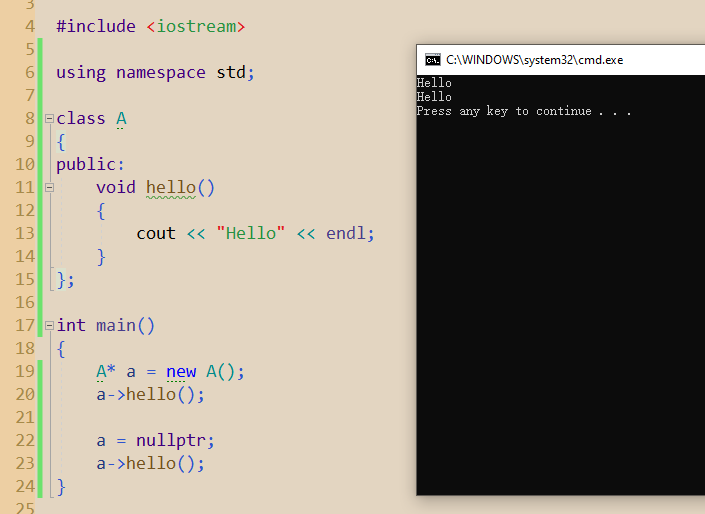
Surprisingly, the code was executed correctly! It’s tested by VC 2019, GCC 4.8.4/7.3.

I never noticed this but after more time thinking, you may understand the reason. It’s because there is no member field de-referenced in C++ class of “A”.

Let me explain it simply. The function A::hello() will be renamed (there is a full set of naming convention) and compiled into a kind of a C function. And the parameter of pointer of “this” will be added into the function (not that simple, but you can understanding like that). So A::hello() will be compiled to a function like _ZN1A5helloEv(A* this). When you call “a->hello()”, actually, it looks like “_ZN1A5helloEv(a)”. Calling a C function will not cause segment fault, but de-referencing will.

The following code snippet will give you better understanding.

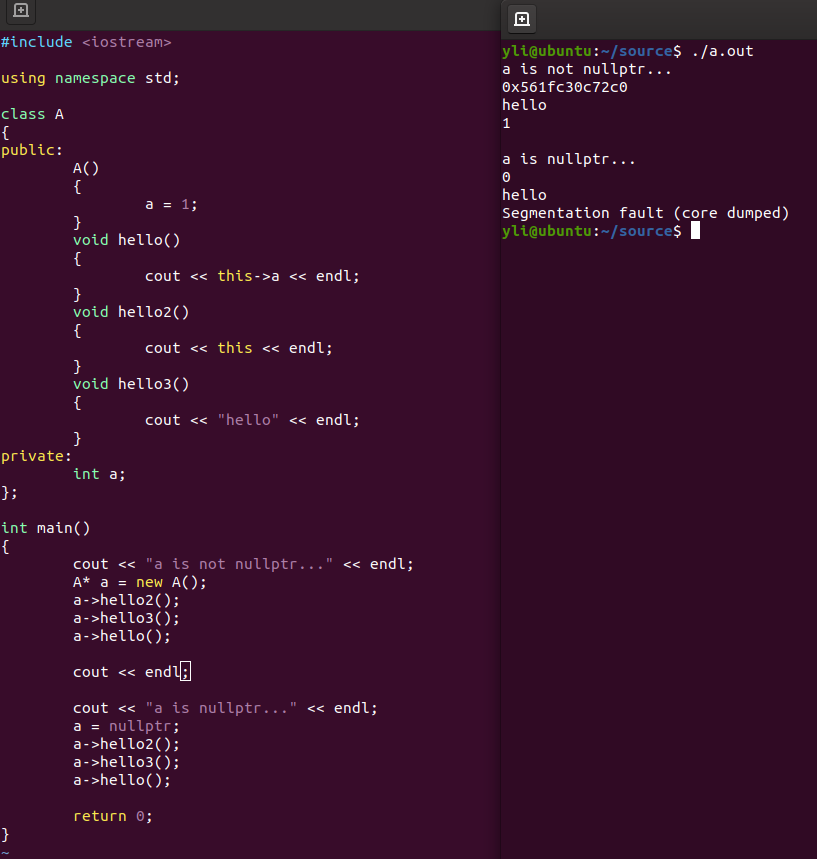
In OOP, this kind of class “A” is not useful. No member fields means a object has no properties. For this case, you should use static function and invoking the function as a class function.

But this tricky behavior is good for us to understand how C++ language works.

Mixin by Interface Default Method in Java 8

In Java 8, the feature of interface Default Method was introduced.

Java 8 introduces “Default Method” or (Defender methods) new feature, which allows developer to add new methods to the interfaces without breaking the existing implementation of these interfaces. It provides flexibility to allow interface define implementation which will use as default in the situation where a concrete class fails to provide an implementation for that method.

This is a very interesting feature and also very useful. With it, we can implement kind of Mixin. Let’s see following case.

Before Java 8

In a system, there is real dog and robot dog, both of them can bark. Before Java 8, we may have the following interface and classes.

Maybe you already see the problem. Dog and RobotDog have the same implementation of method bark(). It’s duplication. It’s not easy to fix this problem, since Dog and RobotDog have different parent classes. RobotDog is not a Dog but it can bark. In Java, there is no multiple inheritance.

With Default Method in Java 8

With default method, the implementation can be more elegant. See the following code.

As you can see, the same logic can easily be extracted into another interface and the implementation of Dog and RobotDog looks simpler.

How about making a RobotDog flying? It’s simple and there can have different options of flying.

Now I have a RobotDog, which can bark as a dog and fly as a bird!

ND4j的CPU与GPU简单性能对比

最近在学习Deep Learning。ND4j是一个类似于Python Numpy的Java版本实现,支持CPU和GPU Backend。很是好奇,这两者性能到底能差多少,于是做了一个小的测试。

安装CUDA Toolkit 8.0

最新的CUDA Tooklit版本是9.1,但是目前最新ND4j的Release版本(0.9.1)还不支持。(看了ND4j论坛里的讨论,master branch已经支持9.1)0.9.1只支持CUDA 7.5和8.0,我的实验中,安装了8.0版本。在这里下载Installer和Patch。

安装完成后,机器要重启一下。

ND4j的Maven配置

在Maven里通过切换Nd4j的artifactId来设置CPU或GPU Backend。

nd4j-native-platform是CPU Backend,nd4j-cuda-8.0-platform是GPU Backend。

一个简单的测试

下面是一个简单的测试代码,两个10K by 10K的Matrices做Outer Product。

我的CPU是i7-5820K,GPU是GTX 970 3.5GB。测试结果真的非常让人吃惊 – GPU 497ms, CPU 7827ms. 差了约16倍。

我终于知道NViDIA的股价为什么涨这么多了!😁


用SWTBot+Junit+Truth做GUI层面的Unit Testing

在开发组里,Unit Testing的方法已经深入人心,Case的数量也越来越多。可因为GUI层面代码的特殊性,目前大多数的测试都针对非GUI层面的Code。这使得占总代码量40%的GUI层面很少被单元测试覆盖。

本文通过一个简单的例子,结合SWTBot,Junit和Truth,实现了GUI层面的单元测试。

SWTBot的安装

SWTBot可以通过Update Site(http://download.eclipse.org/technology/swtbot/releases/latest/)安装。

在开发项目中也要加入SWTBot的依赖,

一个简单的Dialog

让我们来实现一个简单的对话框,用来做两个数的加法。

代码如下:

这里特别使用了setData方法对几个关键的控件设置了“id”,这是为了能在SWTBot中更方便准确的定位待测试的控件。

SWTBot+JUnit+Truth

待测的对话框已经准备好了,下面来写一个简单的单元测试。

几点要注意的地方,

  • 测试Dialog时,要使用setBlockOnOpen(false),否则open()方法会把后续测试代码阻塞掉。
  • SWTBot搜索控件的办法有几种,以Text控件为例,介绍几个常用的。
    • text()等价于text(0), 就是找第一个Text控件
    • text(n), 按顺序找第n个控件
    • textWithLabelInGroup(label, inGroup)等价于textWithLabelInGroup(label, inGroup,0),就是找在某个Group里的第0个Label为”label”的Text控件
    • textWithLabelInGroup(label, inGroup,n),就是找在某个Group里的第n个Label为”label”的Text控件
    • textInGroup(text, inGroup)等价于textInGroup(text, inGroup, 0), 找在某个Group里第0个text为“text”的Text控件
    • textInGroup(text, inGroup, n), 找在某个Group里第n个text为“text”的Text控件
    • textWithId(key, data), 找出key=data的Text控件。这就是和前面setData()相对应的一个API。用ID找还有一个更简单的API–textWithId(value),这个API没有输入key,原因是SWTBot有个Preference给DEFAULT_KEY–org.eclipse.swtbot.search.defaultKey,默认的值为
      “org.eclipse.swtbot.widget.key”
  • 对不同的控件,API会略有不同,不过大同小异。SWTBot现在除了支持基本的SWT控件外,还支持了Nebula Grid,NatTable,GEF等复杂的控件。
  • 写Assertion的部分和普通的Unit Test并没有什么不同。
  • 因为这种Unit Test的写法和普通的JUnit并没有什么不同,所以Headless Build就可以用一般maven test。当然,如果是开发RCP应用,一定要使用Eclipse Tycho插件。
  • 还有一点不同的事,SWTBot的Case一定要在X环境下。如果Build Server上并没有开X环境,需要要安装Xvfb

总结

通过一个小例子,本文讨论了如何使用SWTBot对小型的SWT开发单元,如对话框、Composite等,进行单元测试(SWTBot也可以测试完整的大型应用)。

现在可以慢慢完善GUI层面的单元测试了,下一步也许可以和Cucumber之类的Framework结合起来。😁


Java坑之Class.isEnum()

发现在这个坑是因为代码里用到了cloning库

在做深度代码拷贝时,发现Enum对象也被Copy了,破坏了Enum对象的唯一性。读了cloning的源代码,其实它考虑了Enum的问题,默认也是跳过的。在其1.9.0版本,它使用了Class.isEnum()来检查,但在1.9.2版本中,检查的代码换成了instanceof Enum, 问题也解决了。对比一下,两种API的区别,

输出是

第二行的输出居然是false, 再看看A2的类签名,不是A,而是一个匿名类A$1。这都是因为A2有Override toString方法,Java产生的了一个匿名类。再看看isEnum的实现,

这下都清楚了,JDK里使用通过基本类是否是Enum的方法,判断当前类是否是Enum, 但当有匿名类的出现,父类就不再是Enum,isEnum的检查也就失效了。

难道Enum的匿名类就不是Enum了吗?😈

这个坑大家要小心啊!

使用Java Dynamic Proxy API实现简单的Function Decorator

Python里有非常方便的Function Decorator语法糖,使用起来非常简便。如果想在Java里做类似的事情,可以使用Dynamic Proxy API来实现。

看看这个小例子。有一组Web服务接口,需要访问数据库得到所需的数据。比如,

代码里的Analyzer类会去数据库找到相应的数据。

为了提高访问的效率,加入memcached,在真正的数据库访问之前,先去查看有没有相应的Cache,代码会变成类似的样子,

如果每个服务接口都要做同样的事,可想而知,会有非常多的重复代码。这时就可以利用Dynamic Proxy API来大大的优化代码实现,非常灵活。

Dynamic Proxy API只能针对接口,所以要为原来Analyzer类写一个接口类,如:

然后我们的代理实现类要继承自InvocationHandler,并通过Proxy.newProxyInstance生成真正的代理。看下面的实现,

有了动态代理,原来Web服务接口的实现就非常简洁了。

Java自带的Dynamic Proxy API虽然有些限制,但使用起来还是非常简单的。听说还有更强大的CGLib,有机会现研究一下。😄

聊聊ClassLoader in Java World

ClassLoader是Java技术中非常主要的概念,原因是它用来加载Java Class。如果没有Class,也就没有对象;没有对象,就没有之后的一切了。

Java ClassLoader的默认实现是一种双亲结构,即总是尝试让Parent ClassLoader加载类。这样有一些优点,当然也有很大的限制,比如就不利于不同Module对多版本类的加载。更多的细节,在下面我做的PPT里。

还有些新的理解和发现。

  • 自定义的ClassLoader可以把Parent ClassLoader设置为null,如果再把loadClass函数重写,就可以完全屏蔽default classLoader的影响。如OSGi的Bundle ClassLoader的最终的Parent就不是Bootstrap ClassLoader(Bundle ClassLoader的实现还是会去从默认ClassLoader去加载java.*的类)。
  • 程序执行时,ClassLoader的选择。做几个小实验你就会发现,默认的ClassLoader是“加载当前执行函数所在类的ClassLoader”。在OpenJDK的源码中一通Search,就可以找到一些端倪。

在源文件src\interp\engine\interp.c中,有executeJava()函数中,执行ByteCode之前,先准备了MethodBlock的指针,它中间

可以看看GETSTATIC这个指令的实现(此指令会在读取类的静态方法时调用)。可以看到resolveField()方法,并在mb的Class指针传入。idx是Static Field对应Constant Pool里的index。

resolveField中被调用resolveClass函数

resolveClass又回调用findClassFromClass(其实是个Macro),同样传入class指针。看看Macro的定义,就可以很清楚了。

是从ClassBlock结构中找到对应的ClassLoader.

其实记住这个结论就好。这样就可以完全打错传统的ClassLoader的限制,比如OSGi Plugin/Bundle里的所有类就是由OSGi自己的加载器加载的,非常灵活,可以实现非常牛逼的功能!


正则表达式的动态替换

Java中的String类提供了replaceAll和replaceFirst方法,用来识别符合正则表达式的substring,并全局替换和只替换第一个substring。

但有时情况会更复杂一些。比如转换input string中所有的floating number的单位,从厘米转换为米。这时,之前的函数就帮不上忙了,我们要使用Java Regex其他类的更强大功能。

看看下面的例子。

下面是Test cases。


Google Guava之Immutable Collection

Guava提供了很多Immutable Collection, 包括Set,Map,List等,使用起来简单方便,看看下面的例子。


Google Guava之Ordering

Guava提供的Ordering比Comparator强大很多,使用起来非常灵活。下面是个小例子。