《老人与海》读后

去年,在去夏威夷的飞机,拜读了一下海明威的《老人与海》。小说不长,5个多小时的飞行绰绰有余。读完后,最难忘的是老人的那份坚持。

不就是捕鱼嘛,管它是大还是小,为什么要这么拼命?!老人坚定地用毕生积累的经验和那条大鱼斗到底,哪怕是最后鱼死网破。不能输给一条鱼!这是一个渔夫的惯性思维?老人在捍卫着他的尊严,那是他所剩无几的东西。想想自己,有没有捍卫的“鱼”?应该有,自己好像一直在别人眼中简单且微不足道的技术或项目上花精力和时间,自己好像也进入了一个惯性的思维。捕鱼自然没有那么简单,那些项目其实也充满挑战。怕的是,自己进入一种惯性。自己是否真的喜欢捕鱼,也许不!好在,自己还有很多时间可以学习别的领域,可以去尝试。需要的只是一份勇气吧!

老人和大鱼的争斗非常惊心动魄,但很庆幸,老人最终可以回到那个属于他的港湾,有那个等他回家的男孩。希望将来的自己在一番拼杀后,也能回到一个安静的港湾吧!

Use boost::asio to implement a simple thread pool in C++

Working on a personal machine learning project, I would like to train a model which can recognize my son. 

The first step is to extract my son’s faces from about 20K pictures. OpenCV can help a lot. It’s very handy and there already has the face cascade. Now the point is how to make the image processing faster. As a Java programmer, processing it in multiple threads is the first solution to try. After some searching, a lot of comments led me to boost::asio.

I was a C++ developer before C++11. I have to say, in the last several years, C++ got greatly improved. With boost::asio in C++, it becomes much easier to implement a simple thread pool, similar to Java concurrency.

thread_pool.h

thread_pool.cpp

Image processing code to make pictures smaller.


Create Python Virtual Environment with virtualenv

There are a lot of pros to using a virtual environment to manage different Python environment, which will be independent of each other. The following are the steps to create one under Ubuntu 16.04 with Python 2.7.x

Install the virtualenv with the necessary packages

Create a folder for the virtualenv

Activate & Deactivate the virtual environment

After sourcing the activate script, you can find a “(myenv)” in front of the folder prompt, which is the virtual environment’s name and it has been activated.

Now, the pip can be used to install/update the python modules belongs to this virtual env only.

To deactivate is also very simple.


Hands on Algorithm of K-means

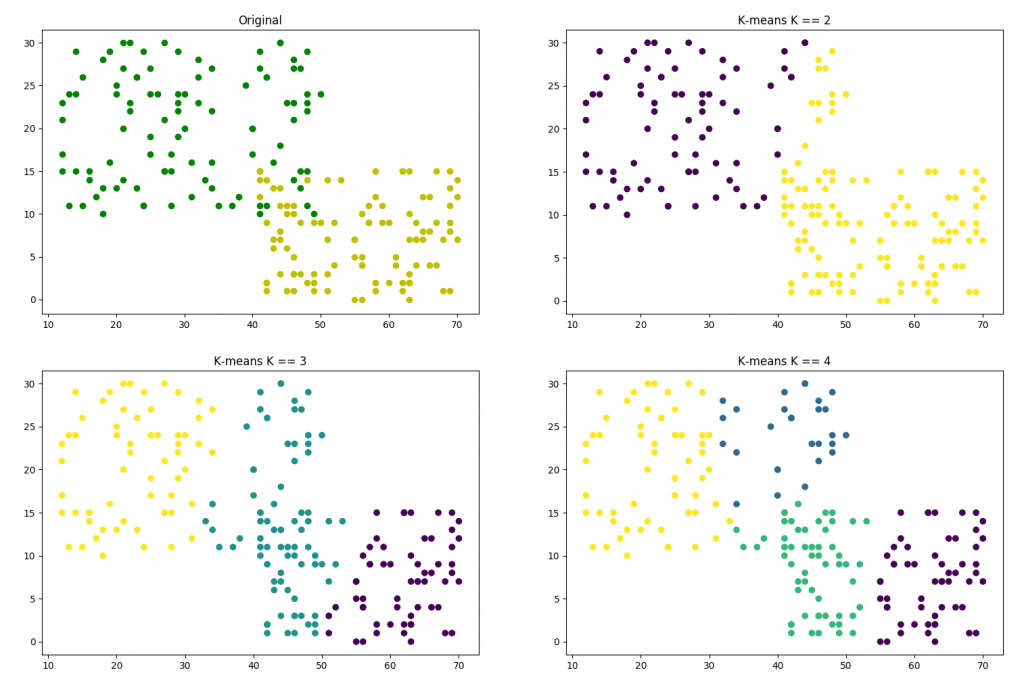
In the ICME machine learning workshop, the presenter talked about the algorithm of K-means to do the data clustering. It’s a simple and interesting algorithm. The following is a simple example, which generates the sample data, sets different K.

Mixin by Interface Default Method in Java 8

In Java 8, the feature of interface Default Method was introduced.

Java 8 introduces “Default Method” or (Defender methods) new feature, which allows developer to add new methods to the interfaces without breaking the existing implementation of these interfaces. It provides flexibility to allow interface define implementation which will use as default in the situation where a concrete class fails to provide an implementation for that method.

This is a very interesting feature and also very useful. With it, we can implement kind of Mixin. Let’s see following case.

Before Java 8

In a system, there is real dog and robot dog, both of them can bark. Before Java 8, we may have the following interface and classes.

Maybe you already see the problem. Dog and RobotDog have the same implementation of method bark(). It’s duplication. It’s not easy to fix this problem, since Dog and RobotDog have different parent classes. RobotDog is not a Dog but it can bark. In Java, there is no multiple inheritance.

With Default Method in Java 8

With default method, the implementation can be more elegant. See the following code.

As you can see, the same logic can easily be extracted into another interface and the implementation of Dog and RobotDog looks simpler.

How about making a RobotDog flying? It’s simple and there can have different options of flying.

Now I have a RobotDog, which can bark as a dog and fly as a bird!

Install Ubuntu 16.04 into Raspberry Pi 3 B+

After some investigation, I finally figured out how to install Ubuntu 16.04 into the new Raspberry Pi 3 B+.

Because the bootloader has been updated, with existing Ubuntu 16.04 images, Raspberry Pi 3 B+ can’t be booted. You will be stuck at the rainbow screen.

To fix it, the bootloader and some other driver files needs to be replaced. Here are the detailed instructions.

Download Ubuntu 16.04 Image File for Raspberry Pi 3

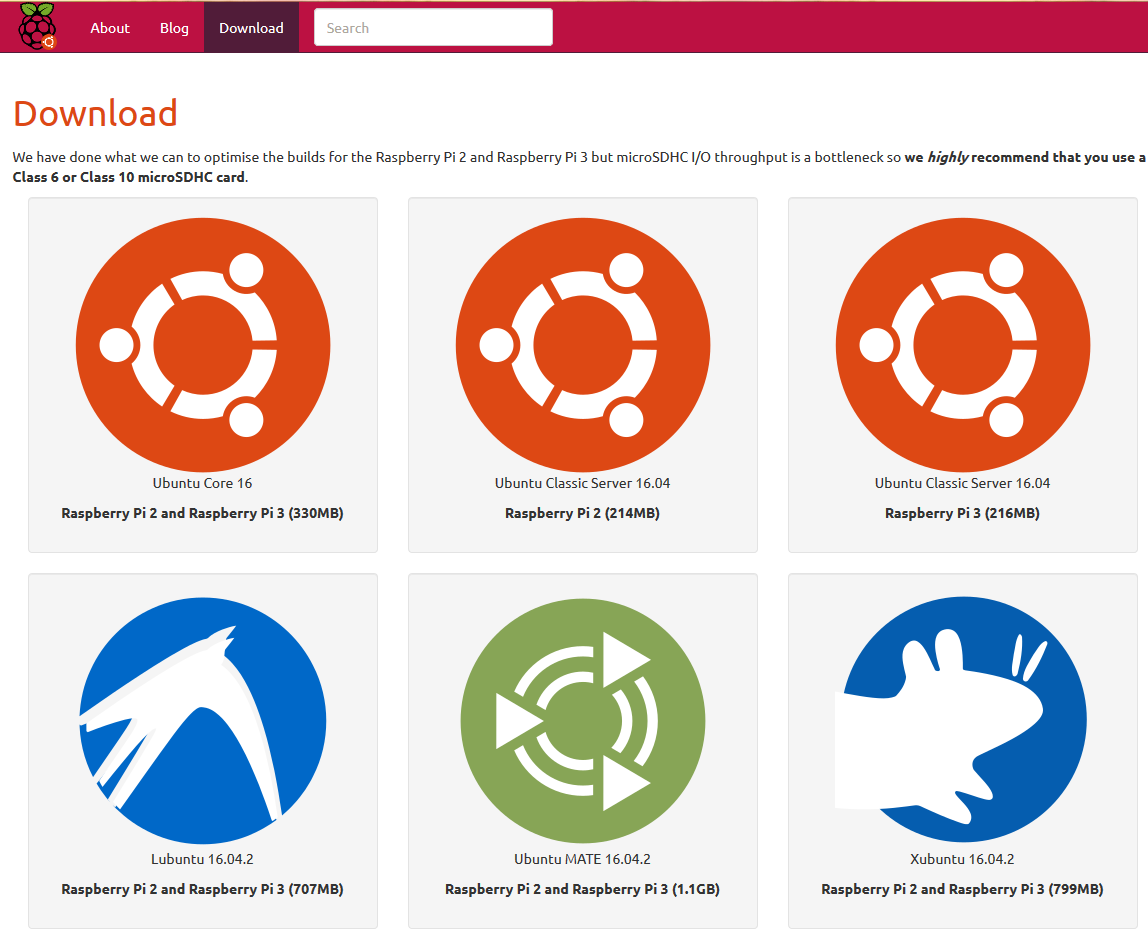
On this page, there are several options

I am familiar with Xfce, so I downloaded the xubuntu 16.04.2 image file.

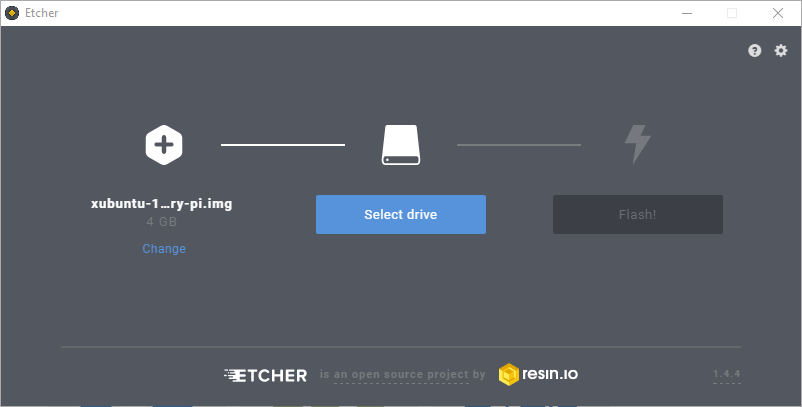
Burn the Image into SD Card

On Windows, you can use a free tool named Etcher

Replace the Bootloader and Driver Files

After burning, there will have two partitions in the SD card. One for boot PI_BOOT, the other for root PI_ROOT

The latest Raspberry bootloader and other driver files can be downloaded from https://github.com/raspberrypi/firmware.

  1. Copy all boot files in folder boot into PI_BOOT partition.
  2. Copy all files/folders in folder modules into PI_BOOT/lib/modules

Boot it

Insert the SD card into Raspberry Pi 3 B+ and connect it the USB cable. It will be successfully booted.

A known problem so far. There has no default wireless network adapter. Need to use a USB wireless adapter.

References

聊聊2017年做得三件技术上的改进

2017年也如同其他年份那样,渐渐远去。技术上的工作内容总还是重覆的多,但还是做了些改进。这些想法其实在我脑中很久,总是因为各种原因和阻力得不到实现。2017算是对自己有个交待了。


二方库开发

可能“第三方库”大家听得多,二方库是说在同一个组织里开发的,用于其他产品的代码库。说白了,就是共同代码提取。

把这事做成阻力远比当初想的大。这不是一个技术问题,或者说技术上不是大问题,更多的是一个软件组织分发、资源分配、挑战现状的问题。在组内大量讨论,和各老板做说明演示后,终于,老板们同意了!至少在我负责的产品里,做现有共同代码的提取,并用独立的项目发布周期维护。

大家给这个项目起了个名字叫“Kona”,是一个Hawaii的岛,那也产咖啡。😀

桌面端开发引入Web技术

其实这是我很久以来的想法,几年前就做了些实验,积累了些经验。结合Web容器,就可以利用大量现有的Web框架和技术,使前端体验大大提升,也可以提高开始的效率。在我”强烈”的推动下,终于把AngularJS+Bootstrap塞到了JavaFX的WebViewer里,收获了些好评。虽只能算是向前迈了一小步,但希望之后的步子能大些。现在组里的同事学习Web技术的热情高涨。

引入Kotlin

感谢Google在2017 I/O大会上把Kotlin提升为未来要支持的一级语言。我在关注Kotlin多年后,终于到了最后一个重要的理由把它引入到开发中。虽然只是先用来做Unit Testing,但之后,我相信使用的地方会更多。它的很多特性绝对是大大的提高“生产力”,同时产出更多安全的代码。

之后。。。

可能这些东西,把别的公司看来都不算什么,技术上并没有什么高深的玩意。但对于我个人,看着这些多年来的想法得以实现,感觉还是很好的。现在很多旧项目占去了大量的时间和精力,要挤出时间想想之后的事情了。希望能有好运气吧!Finger crossed!🖖

ND4j的CPU与GPU简单性能对比

最近在学习Deep Learning。ND4j是一个类似于Python Numpy的Java版本实现,支持CPU和GPU Backend。很是好奇,这两者性能到底能差多少,于是做了一个小的测试。

安装CUDA Toolkit 8.0

最新的CUDA Tooklit版本是9.1,但是目前最新ND4j的Release版本(0.9.1)还不支持。(看了ND4j论坛里的讨论,master branch已经支持9.1)0.9.1只支持CUDA 7.5和8.0,我的实验中,安装了8.0版本。在这里下载Installer和Patch。

安装完成后,机器要重启一下。

ND4j的Maven配置

在Maven里通过切换Nd4j的artifactId来设置CPU或GPU Backend。

nd4j-native-platform是CPU Backend,nd4j-cuda-8.0-platform是GPU Backend。

一个简单的测试

下面是一个简单的测试代码,两个10K by 10K的Matrices做Outer Product。

我的CPU是i7-5820K,GPU是GTX 970 3.5GB。测试结果真的非常让人吃惊 – GPU 497ms, CPU 7827ms. 差了约16倍。

我终于知道NViDIA的股价为什么涨这么多了!😁


Visual Studio Code – Better than Atom

之前推荐过Github的Atom,但之后它的表现不太让人满意,真的非常非常的慢!!

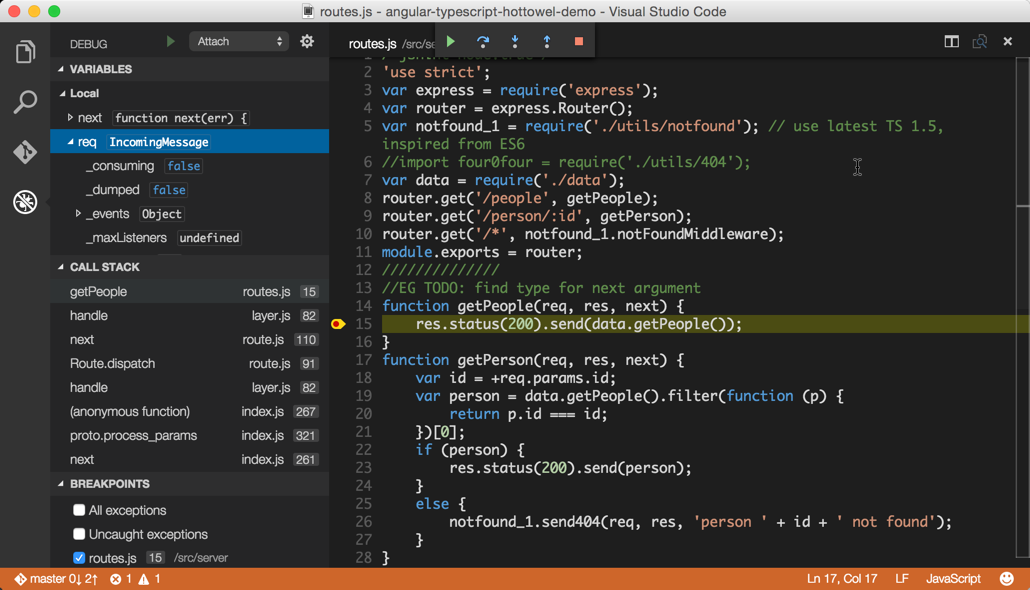
再之后就开始使用Visual Studio Code,非常惊艳的Microsoft产品,运行很快,各种插件也很全,还能跨平台。现在已经全面用它来替代Atom和Notepad++,大家也快去试试吧!😬

用SWTBot+Junit+Truth做GUI层面的Unit Testing

在开发组里,Unit Testing的方法已经深入人心,Case的数量也越来越多。可因为GUI层面代码的特殊性,目前大多数的测试都针对非GUI层面的Code。这使得占总代码量40%的GUI层面很少被单元测试覆盖。

本文通过一个简单的例子,结合SWTBot,Junit和Truth,实现了GUI层面的单元测试。

SWTBot的安装

SWTBot可以通过Update Site(http://download.eclipse.org/technology/swtbot/releases/latest/)安装。

在开发项目中也要加入SWTBot的依赖,

一个简单的Dialog

让我们来实现一个简单的对话框,用来做两个数的加法。

代码如下:

这里特别使用了setData方法对几个关键的控件设置了“id”,这是为了能在SWTBot中更方便准确的定位待测试的控件。

SWTBot+JUnit+Truth

待测的对话框已经准备好了,下面来写一个简单的单元测试。

几点要注意的地方,

  • 测试Dialog时,要使用setBlockOnOpen(false),否则open()方法会把后续测试代码阻塞掉。
  • SWTBot搜索控件的办法有几种,以Text控件为例,介绍几个常用的。
    • text()等价于text(0), 就是找第一个Text控件
    • text(n), 按顺序找第n个控件
    • textWithLabelInGroup(label, inGroup)等价于textWithLabelInGroup(label, inGroup,0),就是找在某个Group里的第0个Label为”label”的Text控件
    • textWithLabelInGroup(label, inGroup,n),就是找在某个Group里的第n个Label为”label”的Text控件
    • textInGroup(text, inGroup)等价于textInGroup(text, inGroup, 0), 找在某个Group里第0个text为“text”的Text控件
    • textInGroup(text, inGroup, n), 找在某个Group里第n个text为“text”的Text控件
    • textWithId(key, data), 找出key=data的Text控件。这就是和前面setData()相对应的一个API。用ID找还有一个更简单的API–textWithId(value),这个API没有输入key,原因是SWTBot有个Preference给DEFAULT_KEY–org.eclipse.swtbot.search.defaultKey,默认的值为
      “org.eclipse.swtbot.widget.key”
  • 对不同的控件,API会略有不同,不过大同小异。SWTBot现在除了支持基本的SWT控件外,还支持了Nebula Grid,NatTable,GEF等复杂的控件。
  • 写Assertion的部分和普通的Unit Test并没有什么不同。
  • 因为这种Unit Test的写法和普通的JUnit并没有什么不同,所以Headless Build就可以用一般maven test。当然,如果是开发RCP应用,一定要使用Eclipse Tycho插件。
  • 还有一点不同的事,SWTBot的Case一定要在X环境下。如果Build Server上并没有开X环境,需要要安装Xvfb

总结

通过一个小例子,本文讨论了如何使用SWTBot对小型的SWT开发单元,如对话框、Composite等,进行单元测试(SWTBot也可以测试完整的大型应用)。

现在可以慢慢完善GUI层面的单元测试了,下一步也许可以和Cucumber之类的Framework结合起来。😁